| | Narcissus' terrain |  |
|
+16Lord GreyWolf Komfritten MasterSlowPoke Gatlag Stonetooth DoomOnYou72 kadafwer franzyland DeafNala Laney jammydodger Mordheimer Da Bank Arachas moggd Chuchosky Narcissus 20 posters |
|
| Author | Message |
|---|
Komfritten

Posts : 637
Join date : 2011-06-29
Age : 44
Location : Nørrebjerg Runddel, Odense, Danmark
 |  Subject: Re: Narcissus' terrain Subject: Re: Narcissus' terrain  Tue Sep 27, 2011 3:10 am Tue Sep 27, 2011 3:10 am | |
| You have a nack for making a piece whitch is very well "connected". Everything is where it should be, and it really "makes sense". I find that the green tank is really good - the weathering is spot on, i believe in it. The sublte plating effects is just enough to make me think: "thats metal plating for you". I AM going to get me some green-stuff! I could not comprehend how awsome the screw heads look to me - they blew my mind =) such little things with such fantastic effects. Those details is what differs for me - make it just that more a "realistic" piece of 40k terrain. For me it actually does not have to make sense - I just have to believe in it  I think you did both. I can relate to the feeling of "this came out ok, but not GREAT". But I think it's great... If I had to find one thing, I feel that you should "close of" the endings of the balsa tree better, or make it "tree" instead of "steel bars". I'm thinking of the walkway especially. Well, all that said, you will see me copy a lot of your techniques to the point of embarrasment - there are really a lot for me to use in your pieces! | |
|
 | |
Narcissus

Posts : 973
Join date : 2010-10-15
Location : Vancouver, BC
| | Subject: Re: Narcissus' terrain Wed Sep 28, 2011 12:21 am | |
| I agree about the green tank. It does look quite real in my opinion. I think it is because I was a bit more selective with the chips and corrosion on this one. The light color helps to show the wear more too.
I also agree with the balsa wood. I just get lazy sometimes. I like how easy the balsa is to put together to build things. I would like to get square plasticard rod to do the same with, but it is quite expensive. I need to find something with a square shape, easy to cut, smooth texture, and cheap. Or I could just be more diligent with adding some card to the end of balsa segments... | |
|
| | |
Komfritten
Posts : 637
Join date : 2011-06-29
Age : 44
Location : Nørrebjerg Runddel, Odense, Danmark
| | Subject: Re: Narcissus' terrain Wed Sep 28, 2011 12:45 am | |
| An alternative material: sprue. They are not squared though... | |
|
| | |
Narcissus
Posts : 973
Join date : 2010-10-15
Location : Vancouver, BC
| | Subject: Re: Narcissus' terrain Thu Sep 29, 2011 12:15 am | |
| Komfritten, sprue is a little smaller than what I am looking for as well. I will keep my eyes open and see what I can find. Here are a few pictures of some barriers I made. They range from 5-8" or so. 3 of them are made by taking a piece of sprue and then putting angled walls of plasticard on them. The others are made by cutting foamboard shapes and then gluing plasticard to the sides to close it off. I painted them using my rust sponging technique. Quick and easy!     Here is a shot of the two different construction techniques.   The foamboard templates were definitely much easier to put together and had a cleaner look when finished. What to make next though? I have an old set of can terrain that needs painting. I have a GIANT can that I am going to make into another storage tank type piece. I am also thinking of making a modular road system. And need to finish my boards. I guess I have lots to make just now... Oh yeah, my shanty town project too. | |
|
| | |
Narcissus
Posts : 973
Join date : 2010-10-15
Location : Vancouver, BC
| | Subject: Re: Narcissus' terrain Tue Oct 11, 2011 2:32 am | |
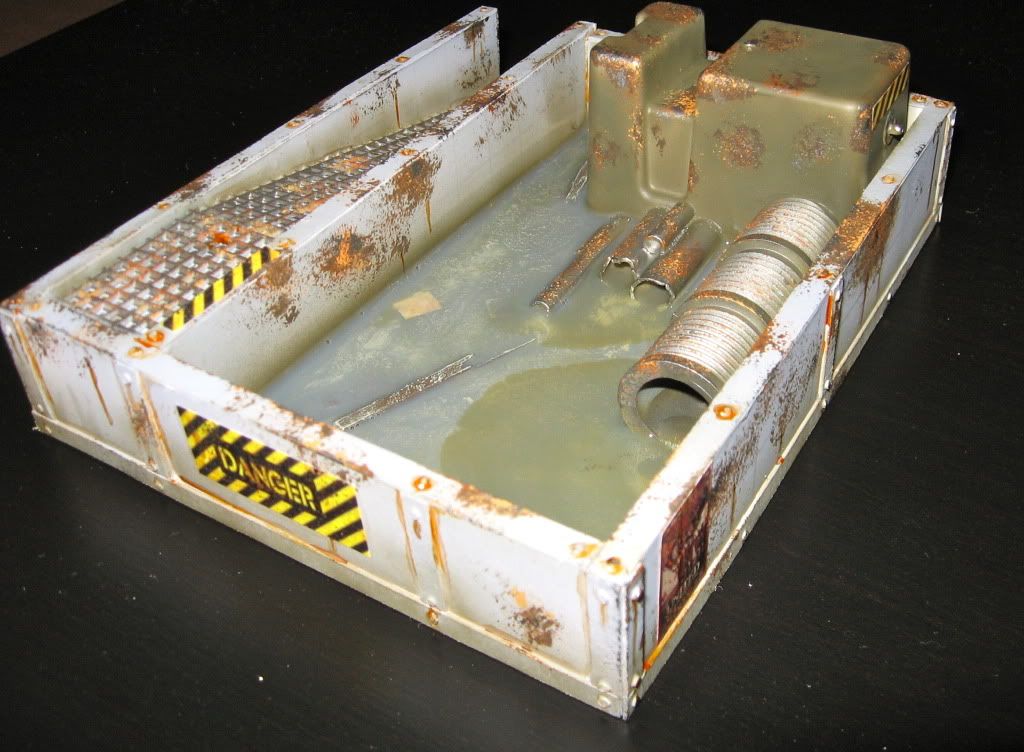
| Another quick update with some WIP pictures. These are new projects. I am away for work this week, so hopefully I will have them painted up by early next week. First a processing plant of some type. This used to be in a different form, but I pulled it apart and built it up differently (better!).    The second is a waste water pool. I will fill it with some water effects.  Finally, I built some walkways to connect various pieces.  | |
|
| | |
Mordheimer

Posts : 9756
Join date : 2009-07-12
Age : 50
Location : Elizabeth City, NC (USA)
| | Subject: Re: Narcissus' terrain Tue Oct 11, 2011 10:09 am | |
| You are a terrain-building MONSTER!
A waste water plant... GENIUS! A zombie corpse in the bottom... uyyy! Great stuff man! I'm learning LOTS of stuff. Please keep posting... this is AMAZING WORK! | |
|
| | |
Narcissus
Posts : 973
Join date : 2010-10-15
Location : Vancouver, BC
| | Subject: Re: Narcissus' terrain Wed Oct 12, 2011 1:58 am | |
| Thanks Mordheimier. Your comment made me decide that I should stick a little rat into the end of the big pipe! No new work done on these as I am away for the rest of the week. I wrote the last post rather hastily, so I thought I would add some details now. The large waste refinery piece is made from two cans, balsa, and some foamboard. I tried to use the foamcore board more effectively in these pieces and I am pleased with the results so far. I tried to carefully cover most of the exposed edges with 5mm thick strips of cardboard (cut from a cereal packet) to create are more varied and interesting look. I also experimented with creating interesting cutouts to create visual interest. Each side has something slightly different. This piece also has something a little special as I made the waste water pool nest inside the refinery plant for easy storage!  After I built the walkways I tried laying them end on end and realized that they made an interesting beginning for a space hulk style board layout! I have always wanted (well, for 6 months!) to make a nice space station/underground lair/factory complex/underhive with narrow tunnels and walkways and all kinds of claustrophobic goodness. I think these pieces will work well in that regards. These bits along with some rooms, some 4" wide corridors of similar design, and some special corner and small room bits will make a nice compact place to have a little skirmish...  And just a quick shot showing how the walkways can connect the different pieces.  | |
|
| | |
dumdeedum

Posts : 243
Join date : 2011-05-31
Age : 33
Location : London, UK
| | Subject: Re: Narcissus' terrain Wed Oct 12, 2011 5:26 am | |
| Oh wow, all of your terrain is genius. Then when those walkways are painted up you are going to have one badass collection of scenery to use in games. Especially since it looks so good unpainted.
I'd love to see any spacehulk/underground lair etc. scenery you make too, I've always loved the idea of it. That and an urban environment are easily my favourite places to imagine fighting in 40k. | |
|
| | |
Gatlag Stonetooth

Posts : 1427
Join date : 2009-07-15
Age : 45
Location : Ridderkerk, The Netherlands
| | Subject: Re: Narcissus' terrain Wed Oct 12, 2011 11:19 am | |
| Awesome pieces of terrain! Keep them comming!  | |
|
| | |
Mordheimer
Posts : 9756
Join date : 2009-07-12
Age : 50
Location : Elizabeth City, NC (USA)
| | Subject: Re: Narcissus' terrain Wed Oct 12, 2011 3:55 pm | |
| Incredible! Can we get a side view of the terrain? That way we get the height of your project. A few models for perspective would be nice. THANKS FOR SHARING! | |
|
| | |
Narcissus
Posts : 973
Join date : 2010-10-15
Location : Vancouver, BC
| | Subject: Re: Narcissus' terrain Thu Oct 13, 2011 2:00 am | |
| Thanks for the kind words everyone.
Dumdeedum-I agree on the complexes and urban environments. I like the structural complexity they provide. I have tried to make most of my pieces fit in many different settings. Hopefully I can get a good set all painted up and finished soon.
Gatlag-Thanks. Will do.
Mord-When I post the final pictures I'll add some models for perspective and get some better side shots. I need to print out a little backdrop or something so the pictures look less awful from the side. The big piece with two tanks stands about 7" in height with access at three different levels.
I am thinking of sticking with army green, battleship grey, hazard stripes and rust as the main colors for my industrial and complex terrain. Any thoughts? Should I add in some more color?
I need to find some local opponents to get some use out of all of this terrain too! I don't really know anyone to play these games with locally yet. I am slowly building some 40k models to meet some new people and recruit from. By Christmas I should have a painted, functional board at this rate and hopefully a fully painted squad or two. | |
|
| | |
Narcissus
Posts : 973
Join date : 2010-10-15
Location : Vancouver, BC
| | Subject: Re: Narcissus' terrain Wed Oct 19, 2011 6:49 pm | |
| | |
|
| | |
Narcissus
Posts : 973
Join date : 2010-10-15
Location : Vancouver, BC
| | Subject: Re: Narcissus' terrain Thu Oct 20, 2011 3:23 am | |
| | |
|
| | |
Arachas

Posts : 1880
Join date : 2010-08-15
Age : 39
Location : Secret Volcano Lair in The Netherlands
| | Subject: Re: Narcissus' terrain Thu Oct 20, 2011 3:44 am | |
| Plain and simple win. 'Nuff said. | |
|
| | |
Gatlag Stonetooth
Posts : 1427
Join date : 2009-07-15
Age : 45
Location : Ridderkerk, The Netherlands
| | Subject: Re: Narcissus' terrain Thu Oct 20, 2011 4:25 am | |
| Looking awesome! Love that rust effect!
Do you have the Woodlands scenics bag with "crystals" or a bottle? I have that bag and haven't used it yet, wondering if it's easy to handle. | |
|
| | |
Narcissus
Posts : 973
Join date : 2010-10-15
Location : Vancouver, BC
| | Subject: Re: Narcissus' terrain Thu Oct 20, 2011 4:30 am | |
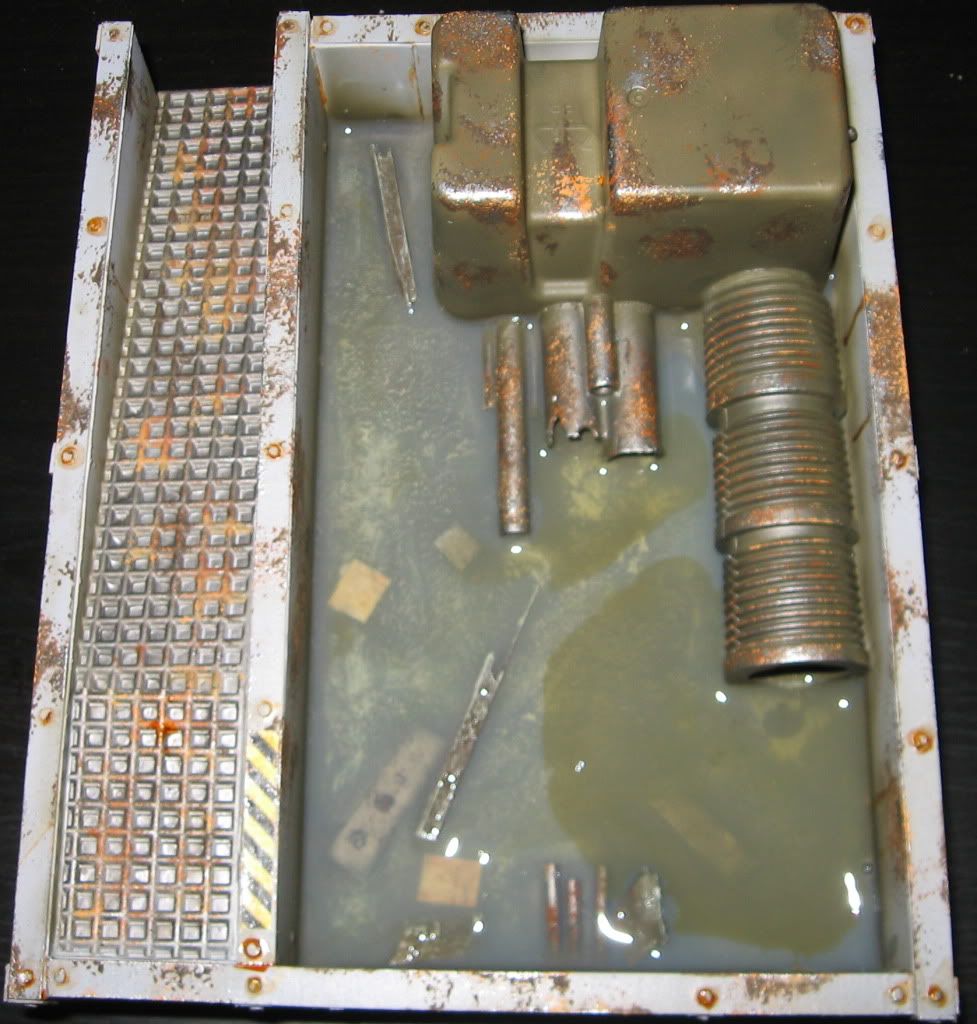
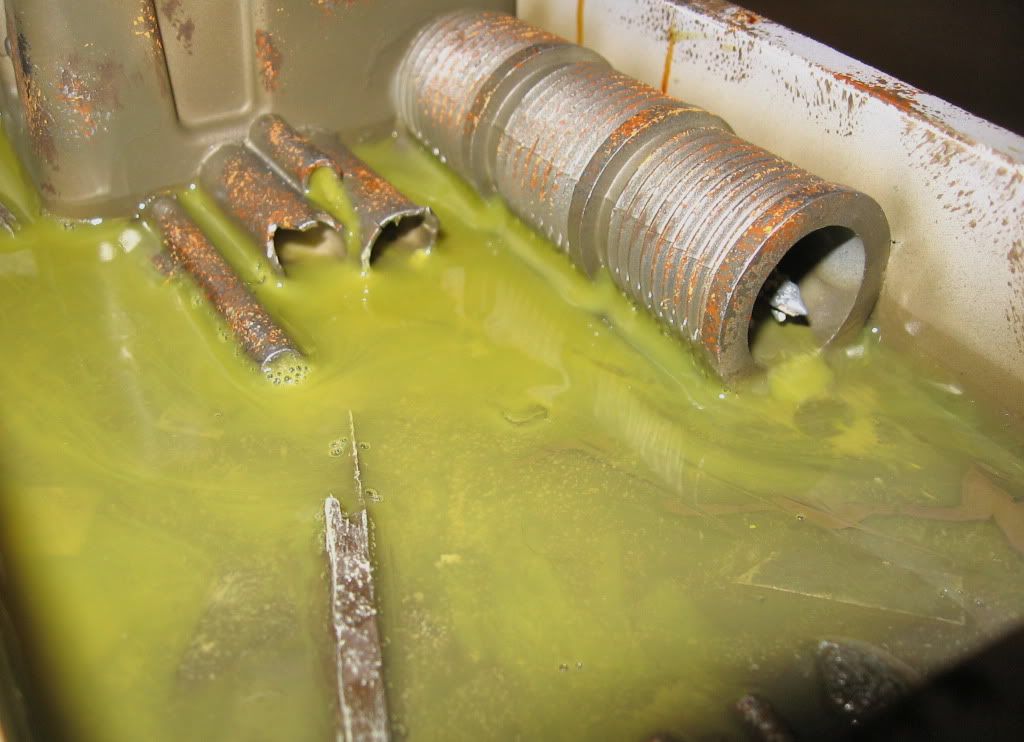
| Thanks for the kind words. The orange streaks look pretty bright in this picture. It is a bit more toned down in real life. The green pigment in the water also keeps changing position as it is setting. Weird. I was hoping to create an effect where some nasty water was seeping out of the pipes.
I have a bottle called "Realistic Water". It isn't too hard to use. Just have to be careful not to add too much or it causes the paint to crack. Hopefully there is no cracking this time... For this one I just let the paint dry and then poured about 2mm of the liquid water in, let it set, and then add another layer 24 hours later.
For anyone considering buying some, I have seen another product being used that is like a thick resin varnish (like 50 coats per layer they say or something). It would give a harder finish. This one gives a soft finish that deforms a bit if you put models on it and it can collect dust a bit too. Not a huge deal, but it is a bit annoying. It was expensive though, so I am trying to use the whole bottle on interesting projects. Like maybe 1 or 2 more water reservoirs like this... Maybe a modular canal or something too. | |
|
| | |
Gatlag Stonetooth
Posts : 1427
Join date : 2009-07-15
Age : 45
Location : Ridderkerk, The Netherlands
| | Subject: Re: Narcissus' terrain Thu Oct 20, 2011 4:42 am | |
| Ah ok you've got the bottle. I have this bag:  Haven't used it yet. You have heat some crystals on a spoon or so before using it. That fact alone makes me feel like a crack junk.  Anyone has experience with this type of water? | |
|
| | |
Narcissus
Posts : 973
Join date : 2010-10-15
Location : Vancouver, BC
| | Subject: Re: Narcissus' terrain Thu Oct 20, 2011 5:13 am | |
| Hmmm. May as well try it out. Make something small and simple like my waste water reservoir or a fountain or something and then give it a go. I am a bit reluctant to do anything too fancy that needs water as the chances of it not working out are fairly high. | |
|
| | |
Gatlag Stonetooth
Posts : 1427
Join date : 2009-07-15
Age : 45
Location : Ridderkerk, The Netherlands
| | Subject: Re: Narcissus' terrain Thu Oct 20, 2011 5:34 am | |
| Yeah I still have to try it out. Have that bag for a couple of years now and still haven't found the "ideal project" to use it on. Guess I will have to create a nice test case for it.  | |
|
| | |
Narcissus
Posts : 973
Join date : 2010-10-15
Location : Vancouver, BC
| | Subject: Re: Narcissus' terrain Wed Oct 26, 2011 7:29 pm | |
| | |
|
| | |
Komfritten
Posts : 637
Join date : 2011-06-29
Age : 44
Location : Nørrebjerg Runddel, Odense, Danmark
| | Subject: Re: Narcissus' terrain Thu Oct 27, 2011 2:16 am | |
| Yes! I've been waiting for this =) I really like the rusting effect, and I trust that the flash is overexposing the pictures a little (having the exactly same problem). The water is for me just the right amount of gross, I find that the swirling green is über nice! Much better than just overall transparent green. I do not understand the colour of the rat? Is he albino? The overoall feel is, as with the rest of the pieces in this thread, very coherent and I find the use of "cheap materials" very inspiring. Thank you for the update - I needed it | |
|
| | |
Narcissus
Posts : 973
Join date : 2010-10-15
Location : Vancouver, BC
| | Subject: Re: Narcissus' terrain Thu Oct 27, 2011 2:55 am | |
| Thanks for the compliments and understanding about the flash.
Ach. The rat. The rat is my nemesis. I had trouble painting him. He looks ok in real life (not good, just like a generally bad paintjob, tabletop quality, maybe). Unfortunately the flash totally overexposed him. I really need to set up a little light booth or something. The flash was reflecting off the water and overexposed the rat. It looks bad. I added another wash to try and improve it. The rat is actually dark grey.
This piece was pretty hard to photograph. Maybe tomorrow I will try to get some better pictures. These ones are a bit disapointing.
I am fairly pleased with the swirling effect as well. Next time I might try and go a bit further with it by having clear and green effects and placing them in different spots at the time of pouring to create different areas with different colors. I would make it a little more transparent too, so you could still see more of the detail underneath. | |
|
| | |
Laney

Posts : 3352
Join date : 2010-02-13
Age : 47
Location : Colchester, Essex, England
| | Subject: Re: Narcissus' terrain Thu Oct 27, 2011 3:38 am | |
| This terrain is amazing - After the IG are finished I must go back to terrain building. I would love to play on you scenery board - it will make for great death squads! Laney | |
|
| | |
Gatlag Stonetooth
Posts : 1427
Join date : 2009-07-15
Age : 45
Location : Ridderkerk, The Netherlands
| | Subject: Re: Narcissus' terrain Thu Oct 27, 2011 5:37 am | |
| Freakin' awesome! The dead pool is looking great!  | |
|
| | |
Narcissus
Posts : 973
Join date : 2010-10-15
Location : Vancouver, BC
| | Subject: Re: Narcissus' terrain Thu Oct 27, 2011 12:46 pm | |
| Laney-I know what you mean. I am struggling to get any models done while I am in this terrain building phase. It is silly though because grey plastic looks silly on painted terrain. Hahaha. I need to find some local people to play with though so I can start using some of this terrain I have built up. I figure I have enough 40k stuff to cover half of a board decently now. I also have some trees and fantasy buildings and corners to flesh out the rest of a board. Just need some opponents.
Gatlag-Thanks. Maybe on the next one I will add a dead body to it as well... | |
|
| | |
Sponsored content
| | Subject: Re: Narcissus' terrain | |
| |
|
| | |
| | Narcissus' terrain | |
|